|
|
 Read
before you proceed!
Read this
DISCLAIMER Before you
Proceed Read
before you proceed!
Read this
DISCLAIMER Before you
Proceed
Any
person(s) using informations from this website constitutes
acceptance of this agreement.
Advanced
electrical knowledge is REQUIRED to begin and
or complete this kiln modification
Person(s)
using this information or any information offered
by this web site are fully responsible for the transfer
of this said disclaimer to any other persons user(s)
of any informations offered by this web site.
The user(s) assumes full responsibility for the proper
interpretations and safe use of these information(s).
Informations here are Not recommended for children
under 18 years of age.
Keep products and all related products away and out
of reach from pets and children.
Improper installation, care or use of products could
result in property damage, Fire, electrocution, blindness,
serious injury or death.
Safety goggles are required during this procedure.
Avoid inhaling fumes or dust. Must use proceed with
proper ventilation. Must dress properly, wear shoes
that completely cover the foot, Full length pants
and a shirt are required during installations or modifications.
Must wear heavy leather gloves accompanied.
Consult your physician before you proceed if you suffer
from any Breathing illnesses, bleeding disorders,
tendentious, carpotunnel or any other discomfort before
proceeding.
If problems and or discomfort result, discontinue
use and consult your physician.
Do not consume alcohol, drugs or other mind altering
substances during this procedure.
If any product defects or excessive product wear are
discovered, do not attempt to use.
In no event shall the manufacturer(s) or retailer(s)
of products used or sold on this web site be liable
for incidental or consequential damages or for any
other damages to the properties or person(s) of the
buyer and or user. The recovery for damages resulting
from any and all causes whatsoever, including, but
not limited to, misuse, negligence, or strict product
liability, will be exclusively limited to the replacement
of the product(s) with respect to which losses or
damages are claimed or to a refund of any purchase
price paid for the products. If you wish to or have
purchased products or used information(s) from this
web site and DO NOT agree and or accept this
disclaimer, DO NOT PROCEED.
Proceed and or use at your own risk.
|
A common question: Why
do I need to convert my pottery kiln to heat treat
flint?
1. Ceramic kilns do not have the fine
tune adjustments needed for heat treating flint.
(Unless they are one
of the newer computer controlled or programmable
type, in that case conversion is pointless)
2. They use a crude method that uses "cones"
that trigger the kiln to turn off at the cone's
designated temperature.
3. These temps are far too hot for flint and knappers
need to achieve temperatures within 15-20 degrees
fahrenheit.
4. The Robertshaw infinite switches allow better
controls for temperatures ranging from 150-800 f.
using only 110v.
It's always best to take those whopping big kilns
and cut them down to size that they will barely
hold a 5 Gal. bucket of spalled or bifaced rock.
Always trim your rock as far down as your skill
lever permits before heating them. The results can
make or break your hard earned stone. Your basicly
going to be junking all the electrical "guts".
The original elements and switches are useless because
the Ohmz are too low and will damage the new switch
and create a serious fire hazard.
YOU MUST JUNK THE ORIGINAL SWITCH(s) AND ELEMENT(s).
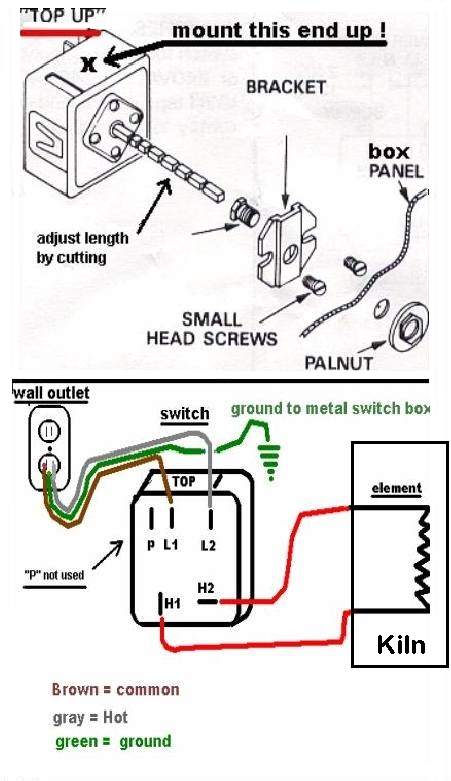
Switch Installation
Proceed at your
own risk. This switch, Robertshaw 5500-135 commercial
infinite switch, is designed for 120v. It can be purchased
from any appliance parts store. I recommend the commercial
grade switches. Each switch is to be used with one
(1) element ranging from 13ohms to 18 ohms. If your
kiln holds one 5 Gallon bucket of rock then one switch
will be enough. I have a kiln that holds 18 gallons
of rock and I have three switches on it. The temps
should not be allowed to exceed 800f. NEVER use the
kiln on or near the "high" setting. Use
caution when settings are near the "high"
setting, the kiln could get stuck in "high"
mode and will cause overheating and damage to your
stone and possibly element(s) too. Never operate your
kiln near any flammable vapors including, Glues, solvents,
fuels or others. Infinite switches produce small sparks
as they "toggle" in their operation.
The switches have a dial with numbers from 1 to 6
on them with quarter and half marks on them. The dial
settings are NOT temperature settings. For example:
You must experiment with your kiln to find out what
temperature dial setting #4 produces. It might be
375f. Make a chart and write down the final values
of each setting. Be sure that you are allowing at
least 24-36 hours for your kiln to max out at the
dial setting you have selected. Don't become tempted
to monkey with the dial when your trying to establish
final values for a dial setting. Always fire FULL
loads of material to get accurate temperatures for
your chart. If you don't have flint to test your kiln,
get some red bricks and fill it up as full as you
can.
Read this carefully!!!
If you are unfamiliar with proper and safe installation
listed below or lacking in electrical expertise, DO
NOT PROCEED!
1. Unplug all power before working on your kiln!
2. Mount your switch in a grounded metal box on the
side of your kiln. Mount with good and safe clearance
from any electrical connections to the element, power
cord or switch itself.
3. Be sure switch is mounted with the "top"
indicator is facing upwards. See diagram below.
4. Use a 14 or 12 gauge cord with ground wire to ground
the metal switch box. The best option is to buy a
new one or remove one from an old appliance with a
ground wire still intact. Full size freezers, refrigerators,
microwaves ect… are suitable choices. Fully inspect
for any flaws and discard if any are found. Fully
test with a continuity meter to be sure there is good
continuity.
5. Wire switch as shown in the diagrams below using
good quality crimp connectors.
6. Check all connections with a multi-meter to insure
there are no "shorts" or "longs".
7. Double check your element to be sure it is in the
proper Ohms operating range for this switch (as per
diagram). Do Not Use old or original elements with
this switch. They are NOT compatible.
8. See diagram Below for details. Please note: the
"P" (pilot light) terminal is not used on
this configuration!
9. Use proper terminal leads on all connections, NEVER
use electrical tape! NO connections should be located
inside the kiln. All connections should be completely
outside the kiln and clear of any metal or conducting
parts!
 Installing
the element Installing
the element
The elements are hand wound by us. So if you need
one, email me and I will make one up for you. They
are $18.00 and $7.00 to ship here in the USA.
1. The element's ohms must be between 13-18 for the
Robertshaw© Infinite switch. Nothing more, nothing
less.
2. The new element will need to be stretched to fit
your kiln so that it pushes against the sides of the
kiln and seats itself in the channel in the refractory
bricks. This is important: The element must be evenly
stretched or you will shorten its life. Bunched areas
will get much hotter than the rest of the element.
For a kiln that is near the diameter of a 5 Gallon
bucket, you should be able to have stretched the element
around the inside of the kiln twice.
Once the kiln is used for the first time, the element
will shrink a bit and you will have to re stretch
it. Be gentle, they will be more brittle.
3. Do NOT cut the element for any reason! If you break
the loops, you can straighten some of the coil to
create a new loop. The loop must wrap against itself
to reduce ohms resistance and also heat near the point
of connection to the wire leads that go to the switch.
These wires should all be 14 AWG minimum.
4. Connect the element to the switch. (H1 and H2 marked
on the back of the switch).
5. You can use solderless wire butt connectors 10-12
AWG rated for 24 amps. Or use 10-12 AWG lugs. Be sure
that these cannot and do not ever come in contact
with ANY thing conductive. Do Not rely on ANY insulators
other than the appropriate ceramic type. Don't fool
around with this stuff! If you are unsure, consult
a certified electrician.
Operate the kiln safely!
1.NEVER operate kiln on a wooden or flammable or combustible
surface.
2.Place kiln elevated on concrete blocks or metal
stand. Do NOT set directly on any floor concrete or
otherwise!
3.Keep kiln at least 20" from any walls or other
objects at all times.
4.Use cement fiberboard on near by walls for an extra-added
protection!
5.Use a "dedicated" outlet for each kiln
on a 15-amp breaker.
6.Never heat-treat large blocks of stone. Stones could
and will likely, violently break apart. This could
knock the lid right off a kiln ejecting VERY hot Fragments,
creating a serious fire hazard!
7.Keep your kiln under a roof and out of the weather,
Damage to electrical parts will result.
7.Never operate kiln with flammable, combustable or
explosive fumes, liquids, solids or vapors present.
8.Avoid heat-treating in your home or living space.
Heating certain rocks can produce toxic or poisonous
vapors, especially if cut on rock saw!
9.ALLWAYS WEAR A RESPIRATOR WHEN LOADING OR UNLOADING
YOUR KILN!!! DUST FROM BRICKS AND ROCKS ARE DANGEROUS
TO YOUR LUNGS!
10. Never open the lid on your kiln when temperatures
are above 140 degrees f. You'll get burned and can
cause temperature shock to the rock resulting in cracked
stone.
11. Chip an arrowhead.
|
|
