Careful
and properly built striking platforms are one major key
to predictable flake removal. Please note that one must
have an understand knapping "terminology" to
benefit from this article. Platforms have four basic components.
All four components must have the proper characteristics
for a flake to be removed predictably, and if it does
not, the struck flake (if any) WILL become undesirable.
Lets look at the platform's components and why each part
is so essential. You must understand that these four components
almost always have to be created from scratch. Rarely
are they just sitting there waiting for your eager billet!
These are also listed in the order they should be made.
The descriptions here are intended for bi-facial preform
stages but can be applied to spalls. Note that one must
be quite proficient with a pressure flaker before you
master percussion flaking. This is because great percussion
platforms start with good pressure flaking.

Now that
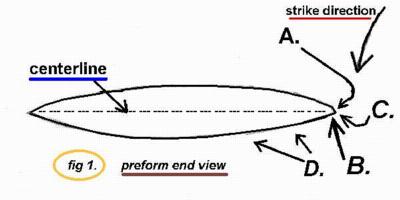
we have divided the platform into four parts, lets give
them all a letter code: "A", "B",
"C" and "D", as shown in fig. 1.
I will discuss the following topics relating to each
platform component.
1. It's purpose and/or function
2. "How to make them"
3. The attributes it should have
4. Trouble shooting... cause and effect of poorly made
and or Improperly prepared platforms
Part A
The first
we will look at is "A". This is the part commonly
referred to as the "bevel". The purpose of
the "bevel" is that it serves as the surface
that is actually struck to produce the flake. How do
we go about making the bevel? The most accurate way
is to use a SHARP pressure flaker. You can use a billet
to produce this on an early stage perform or spall.
It is highly recommended that you use a pressure flaker
to make this part. What attributes should part "A"
have? This part should have a bevel some where near
45 degrees. This angle can be changed by making another
"pass" or modifying angle of pressure. The
bevel should be smooth. What I mean by this is that
it should not contain irregular bumps, humps and micro
ridges. It should be just as if you used a router on
a piece of wood.
Part B
Part "B"
gives support to the strike. It is actually made from
part "A". There are many ways to make this.
The basic idea is that you're actually removing extremely
tiny chips off the bottom or underside of the "bevel".
(This is the same side the thinning flake will be removed
from.) Remember, your not really abrading the edge so
much as shaping it. Here's a couple ways of doing this.
The first way is to use a course abrader. Just rake
the edge downward gently and repeating this process
just long enough to feel less resistance as the abrader
is raked downward. You can also rake off these "micro"
flakes with the edge of your pressure flaker or use
a copper bar to do the same thing. Keep in mind this
is a very important step! If you rake it too hard or
use or use excessive force it will be too strong and
will greatly stress the stone upon striking it. Rake
thick performs harder than thin ones. If "B"
is not raked enough it will cause the platform to crush
or cause a step fracture very close to the edge. Too
much and you will break it! So don't over do it.
Part C
Moving
onto part "C". This part is also made from
"A". It is the polished area that your billet
actually strikes. It is better described as polished
but commonly referred to as abraded. Polishing sounds
so much more precise and civilized. To prepare this
part properly one must first have created "A"
and "B" flawlessly! You simply grind up and
down the platform edge. What I mean by this is your
grinding from base to tip. Another description of this
is if you're holding the preform flat, the grinding
motion is horizontal NOT vertical. A vertical motion
will destroy the platform. You want to use course abraders
for preforms thicker than 5 to 1 width to thickness
and a medium abrader for thinner bi-faces. Be cautious
not to over grind, this will also cause splits or breakage.
Keep in mind... the better you make your platforms...
the less grinding they will need!
Part D
Finally
part "D". This is what I like to refer to
as the "road" the flake will travel down.
This must be closely looked at before you decide to
remove any material for the purpose of platform construction.
If the surface area of part "D" is irregular,
then it must be corrected before an attempt at flake
removal is made. Simply put, don't waist the time and
circumference of your bi-face trying to chip off an
area with a stack or concavity. Just work on either
side of it. Build platforms to target areas with good
convexities. Stay away from concavities. You can modify
the surface of your bi-face by pressure flaking if necessary.
You must be careful not to cause "micro" steps
with your billet or Ishi stick. It will just be more
trash for your thinning flake to contend with.
Just remember to take your time and analyze. Be safe
and have fun!
- Mark
Bracken
Flintknappingtools.com
|